
Create a priority list
HRM has its own view under Personnel > LAS > Priority list in case of termination, where the calculations for the priority order are performed and displayed.
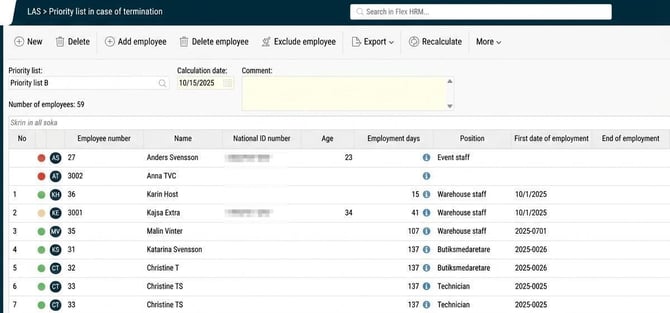
Here we guide you through the steps to create and calculate a new priority list.
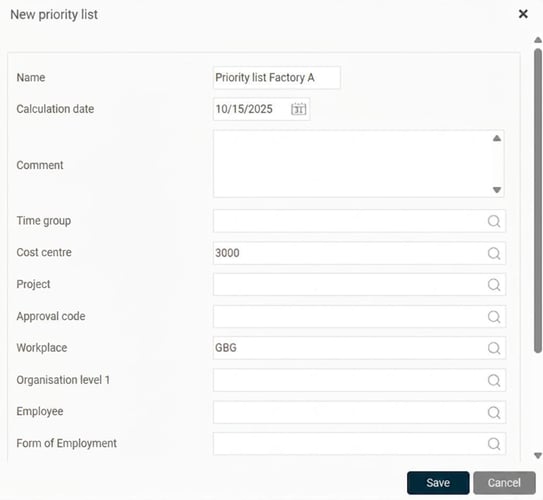
If you click on New and define the current priority group using selection
-
Start by giving your list a name.
-
Specify a Calculation date. All calculations will be carried out up to and including the date you enter here.
-
In the field Comment you can, for example, explain the priority group. This field is optional.
- Select which employees should be included in the priority group.
-
Once you have made your selections, click on Save.
When you save, the system starts a calculation in the background. The priority list is displayed as soon as the calculation is complete.
The difference between Calculation Date and Calculation Time
It is important to distinguish between the two dates:
-
Calculation date is the date you yourself select as the end date for the calculation.
-
Calculation time is shown at the top right of the list and is the point in time when the calculation was actually performed.
Which employees are included?
The requirement for an employee to be included in the list is, apart from matching the selection,
- That there is an active employment period for the calculation date.
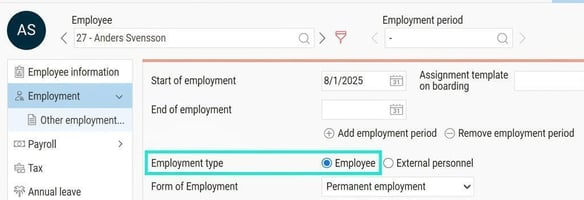
- That the employee is marked as Employee in the Employment type in the employee register.
The priority list
At the top left of the view you select which priority list you want to work with and you can easily access earlier lists.
Once you have selected a priority list, you will see a list of the employees included. You can easily sort by any column by clicking on the heading.
Furthest to the left there is a column for No, i.e. the sequence for termination for each employee. Those who do not have a number are either excluded from the priority list, lack a date of employment in the employment period or have just been added to the list without a recalculation having been done since the last calculation.
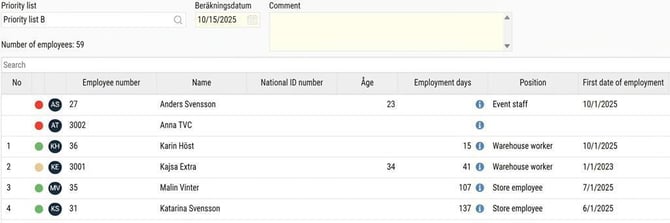
Colour explanation
 |
Calculated successfully. |
 |
Only displayed when calculating periods based on days worked, where there are provisional timecards/timesheets. The employment has been calculated, but there are periods in the timecard/timesheet that have not been reviewed. More information regarding the specific employment period can be found in the info pop-up in the "Employment days" column. |
 |
One of the employee's employment periods is missing a "from" date. Please note: The "from" date can be left blank if the employment has an opening balance with an associated date. |
 |
The employment is excluded. |
 |
The employment has not been calculated. This occurs after an employee is manually added to the seniority list and requires a recalculation of the entire list. |
 |
The info pop-up, found in the "Employment days" column, shows which periods the collected days originate from, as well as whether the calculation is based on calendar days or days worked. |
Add, Delete and Exclude Employee
To adjust the selection, you can manually manage which employees you want to add, remove or exclude.
Add employee – shows employees who are not yet part of the priority list; the selected employee is added to the priority order. You then need to manually trigger recalculation of the entire priority list once all employments to be included have been added.
Delete employee – shows employees who are part of the selected priority list; the selected employee is removed completely from the list. An employee who is not part of the priority group should be deleted from the list.
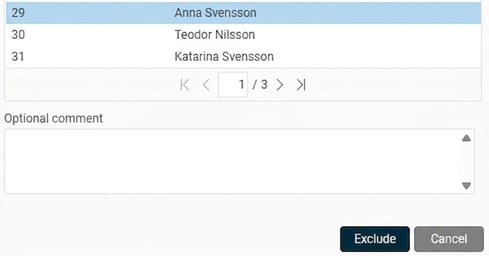
Tip: the employee you select in the list will also be marked in the popup that appears when deleting or excluding an employee.
Exclude employee – shows employees who are part of the priority list. These will remain in the list but are excluded, which means that regardless of the number of days they have, they will not receive a priority order. This is used for employees who are part of a priority group but for special reasons need to be excluded, e.g. key personnel, family members, CEO, etc.
Note: to undo an exclusion in the list, you first need to remove the employee from the list and then add them again, which then requires recalculation.
An optional comment can be specified for each function above. This comment will appear in the change log.
Other icons
Recalculate
Recalculates the entire priority list. Useful when you have made changes to employments that should be reflected in the priority list.
The priority list is displayed as a snapshot of how the employments look at the moment the calculation is made. This means that changes to employments made afterwards will not affect the calculated list until it is recalculated.
Log
Displays a change log where you can see who made changes, to which employee and when; the comment will also appear here. This log can also be exported to Excel (.csv or .xlsx). The following changes are logged:
- Creation of the priority list.
- Recalculations.
- Addition of employee.
- Removal of employee.
- Exclusion of employee.
Export
The entire list can here be exported to Excel as .csv or .xlsx.
Please note: This article is AI-translated. This means that linguistic errors or misunderstandings may occur.