
General settings for a role
Menu settings
Allocation of roles
See which users have a particular role
A role in Flex HRM determines what a user can see and do in the system. For a user to be able to log in and work in Flex HRM, they must be assigned at least one role. A user may have multiple roles simultaneously in order to receive the correct authorisations. For example, a user might require an authorisation on an individual level to manage their own time report, while also needing another authorisation at company level in order to see all the company's employees in the Attendance Board (but not be authorised for their time report).
General settings for a role
You will find the settings for roles under Users/Authorities > Roles
On the tab General you can name and describe the role. The description is displayed as a tooltip when you hover your mouse over the role name in the user register.
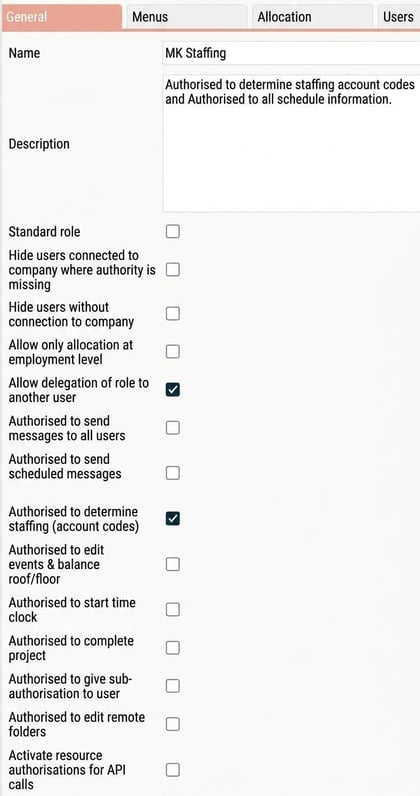
You can also manage several other settings here:
-
Standard role - If you set a role as the standard role, it will automatically be allocated to new users added to the system.
-
Do not show user connected to company where authorisation is missing ; Do not show user without a connection to company - You can limit which users are visible for the role. For security reasons, these settings are enabled by default when a new role is created.
-
Only allow assignment at employment level - Use this setting to prevent the role being used at levels other than employment. This is often applied to protect sensitive data such as payslips.
-
Permit delegation of role to other user - Tick this if the role should be able to be delegated to another user. This is useful, for example, for approvers who want to delegate their approval rights during their absence.
-
Authorised to send scheduled messages - Tick if the role should be able to send messages to employees. You can choose to authorise sending messages to all users in Flex HRM, or only to those belonging to the same company. Messages are managed in a panel on the front page, as well as in the Messages view in HRM Mobile.
-
Authorised to determine staffing (account codes) - Grants authorisation to staff employees on account codes.
-
Authorised to edit events & balance roof/floor - Allows you to change or create your own event functions and balance roof/floor.
-
Authorised to start time clock - Grants the user permission to start the time clock, which requires login.
-
Authorised to complete project - Allows completion of projects directly from the travel expense claim or the time report.
-
Authorised to give a user authority to partially audit - Allows you to allocate partial review rights to users.
-
Authorised to edit remote folders - Grants authorisation to edit remote folders, which are used, among other things, for scheduled imports and exports.
-
Enable resource permissions for API calls - Is being used to finely manage authorisations for API calls, per API resource.
Menu settings
Under Users/Authorities > Roles > Menus tab you can control which menus the user will have access to. The tab is divided into the tabs General and Company-bound.
-
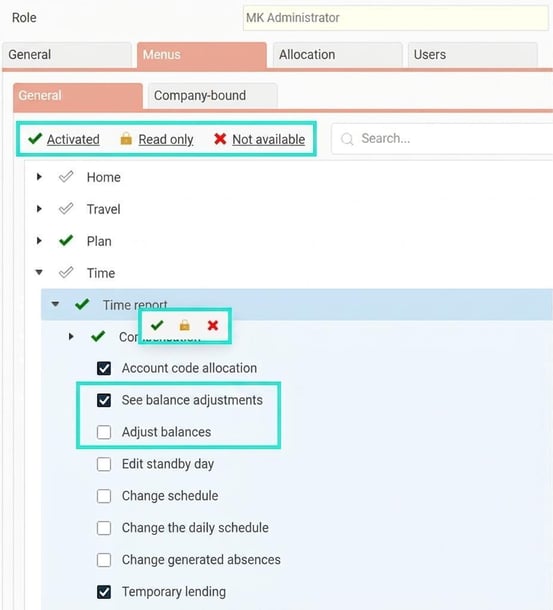
The General tab - Here, all menus in Flex HRM are listed. You set a green tick for menus the users should be able to see and use, a padlock to give read only access, and ared cross for the menus that should not be available. Many menus can be expanded, allowing for more specific authorisation settings.
You can select multiple menus at once by holding down the CTRL key on your keyboard.
You can either select and click the green tick, padlock, or red cross at the top, or right-click on a row to choose the authorisation. Both options are highlighted in the image below.
Please note that when a main menu is set to a particular authorisation, the same authorisation is automatically applied to the related submenus.In the image below, the menu Time and its submenu Time report are expanded. The role has authorisation for the time report, but not for all functions; for example, it can see balance adjustments, but is not permitted to make its own balance changes.
Search in the role tree
You can use the search field to look up a menu instead of manually clicking through it. The search results will show all matching menus, with any parent nodes.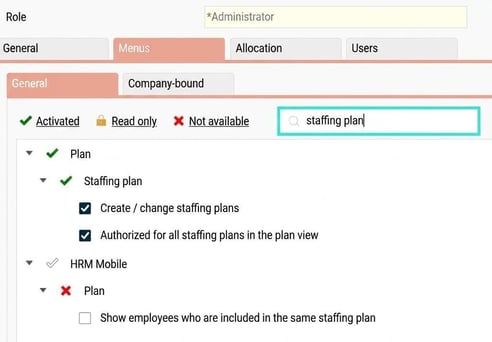
If, after searching, you click on a parent node, the search is reset. This is to clarify that a change to a parent node affects all sub-nodes (not just the searched one).
-
The Company-bound tab Is used for registers that may differ between companies, and therefore cannot be managed entirely through the general authorisation tree. As on the General tab, you set authorisations with a green tick, padlock or a red cross. Read more in the article How does company-bound authorisation work?
Allocation of roles
Under Users/Authorities > Roles > Allocation you can control whether users with the selected role may allocate roles to other users. You can choose to grant authorisation to allocate No roles, All roles or According to the selection. If you select According to the selection you will need to specify which roles may be allocated.
You can also choose whether the authorisation should be extended to all existing companies by ticking the box Authorised to delegate roles in all companies.
See which users have a particular role
On the tab Users you can see the users who have the current role, as well as which company and employee they are connected to.
Related
Roles and authorities in Flex HRM
How does company-bound authorisation work?
Please note: This article is AI-translated. This means that linguistic errors or misunderstandings may occur.