
Export types
Create an export template
Export data
Schedule exports
Export templates
Through exports, you can easily and quickly extract data from various data sources.There are a number of different export types you can use to export data from Flex HRM. All users with authorisation to Actions processed > Service routines > Exporthave access to all created reports and all employees.
The output is provided as raw data in Excel or text format. Unlike the Statistics Centre, you do not get graphical printouts or comparative selections.
Export types
Flex HRM offers several export types that you can use to retrieve data.
-
Time reports : Retrieves data from time report entries. Your selection here should include status and date interval.
-
Invoice data: Exports data that has been released for invoicing. This requires the data to be released first.
-
Invoice data (SIE4): Creates invoice data in the standard SIE4 format with released data.
-
Employees/Users: Retrieves data from the employee and user register. Your selection here should include status (current and/or former employees), and whether to include only new or updated since the last export (if you plan to schedule the export).
-
Travel expense claims: Exports transactions from travel expense claims.
-
Absence (from Time): Retrieves absence from the absence function.
-
Employees/Users (Hogia HR IPA): A custom export type designed for import to Hogia.
-
Employee Tables: Retrieves data from tables created in the employee register via additional fields.
-
Account codes: Exports registers such as project and cost centre.
-
Accounting of wage costs: Here you can customise your accounting file to suit your finance system, if you are unable to use the standard SIE4 format.
-
Credit card transactions: Export type for importing credit card transactions.
-
Salary basis for COINS: COINS is a system owned by Försäkringsgirot that manages insurance administration such as pension insurance. For their calculations, they require specifications from the payroll system, which are transferred via an XML file in COINS format.
-
Union fees: Creates a file that reports union fees per person for companies that pay the fee for their employees.
Create an export template
To create a new export template, go to Settings > Import/Export > Export templates.
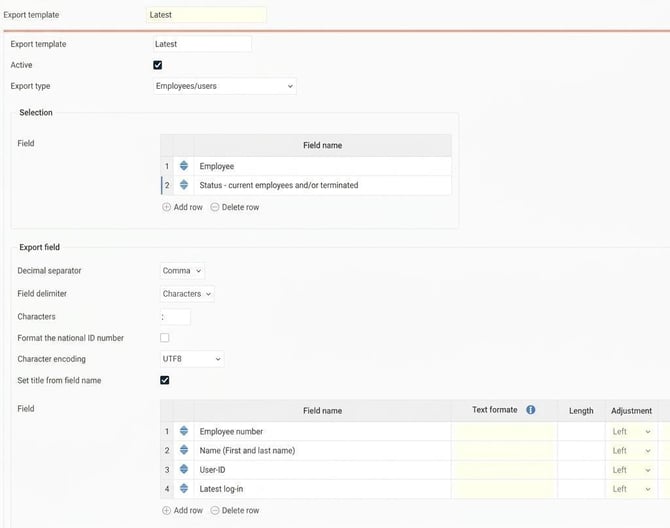
Click the New button, give the export template a name and select Export type , i.e. which data source the report will be based on.
Selection
Each export template allows you to set up a number of different selections to limit which data is exported. For example, you can select employee, date, or home account codes.
Export fields
Here you specify the field delimiter and how the file should handle decimals.
If, for example, you choose fields for employee number, first name, surname and city, and a semicolon (;) as field delimiter, the output will appear as follows:
1234;Anders;Karlsson;Karlstad
- Decimal separator: Specify how decimals should be displayed. One example is to use a full stop as separator
10.10. - Field delimiter and characters: Decide the separation between fields.
-
Format the national ID number: Tick the box if the national ID number is included in the export. This will format the national ID number according to the standard. For Swedish national ID numbers, with hyphen.
-
Character encoding: Change this according to the format required by the receiving system: UTF-8, ANSI, IBM437, UTF8 w/BOM.
-
Set title from field name: Select to have the Heading below automatically filled from the field name. You can change it if you want a different heading for a field.
Field
Specify the fields you want written to the file and how they should be written. For some fields, such as date, you can choose how it is formatted. Click the info-i next to Text formate for instructions.

When you have finished the settings, click Save.
Export data
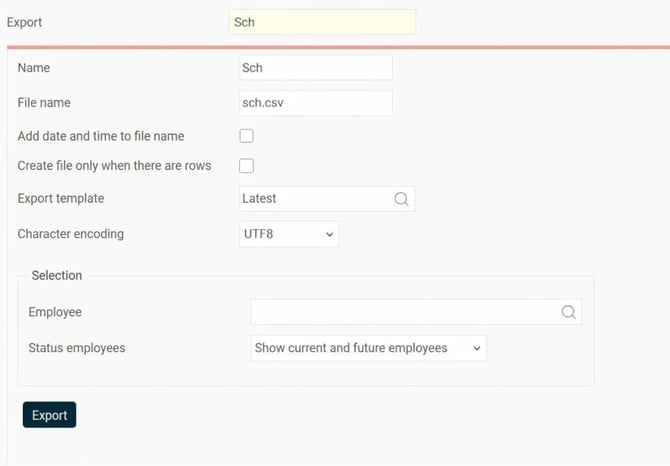
To export data, go to Actions processed > Service routines > Export.
-
Give the export a name.
-
Specify what the file should be called.
-
Select the export template you have created.
-
Select Character encoding (UTF8, ANSI, IBM437 or UTF8 w/BOM) depending on what the receiving system requires.
-
Make any selections to limit the export. Selection options were set in the export template.
-
Click Export to create the file.
-
You will receive a notification when the export is complete. You can download the file there. It can also be downloaded from the log in the export view.
Schedule exports
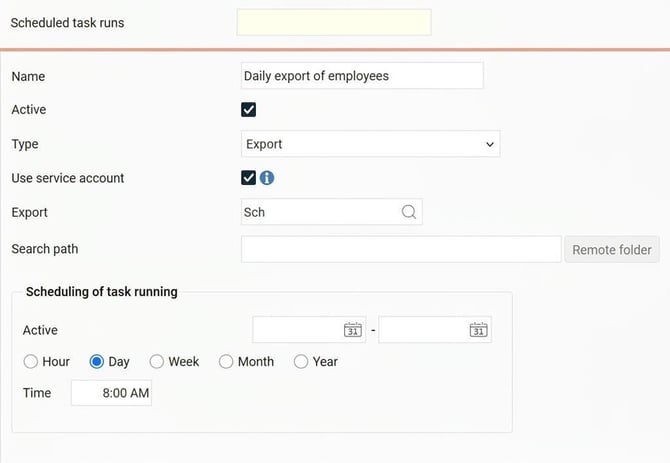
You also have the option to schedule data export. If you have created and saved an export with the desired selections, you can schedule it by going to Settings > Import/Export > Scheduled task runs
-
Give the scheduled task run a name.
-
Select which export you want to schedule.
-
Set up how often the export should run and the time.
-
Set up a remote folder where the export file will be saved.
-
Save
-
At the point in time you set, for example daily at 08:00, the export will run.
Good to know about service account
If you do not select the setting Use service account the user who saved the task run will be considered the export user. This can cause issues if that user becomes inactive or their authorisations change.
If you use a service account, the task run is not dependent on a user.
You can view in Scheduled task runs which user created and last changed a scheduled task run.
Please note: This article is AI-translated. This means that linguistic errors or misunderstandings may occur.