
Import types
Create an import template
Import data from file
Schedule import
Import data into Flex HRM
By importing data from files in the formats .csv, .txt or .tsv you can effectively add large amounts of information into Flex HRM. This article describes how to create an import template, import files and schedule imports.
Import types
Flex HRM supports several import types. Which are available to you depends on your licence. For example, a licence for HRM Travel is required to be able to import car trips.
These are the import types that can be done:
-
Accumulator values
-
Employees - Children's register
-
Employees - Fixed transactions
-
Employees - Tables
-
Employees/users
-
Position register
-
Car trip
-
Budget
-
Absence
-
Account code
-
Account code combinations
-
Pay code register
-
Payroll transactions - Historical data
-
Payroll transactions - Ongoing import
-
Balance
-
Schedule
-
Time report - Allowances
Create an import template
An import template is necessary for Flex HRM to know how an import file should be read. The template defines which information should be entered into the system and where. For example, if you are importing employees, you need to specify what in the file is employee number, first name, surname and so on.
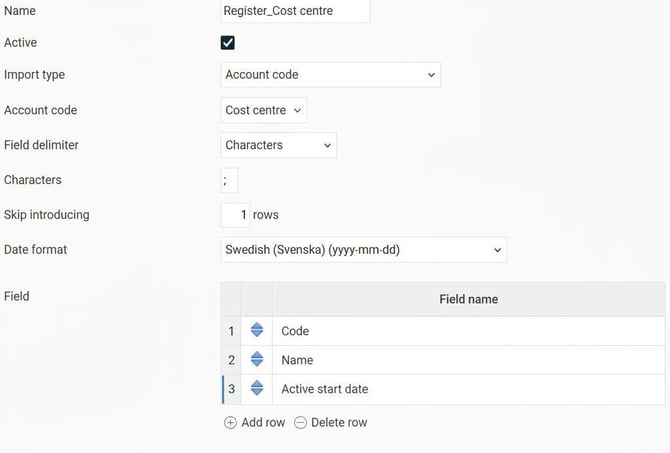
Here's how to create an import template:
-
Name: Specify a name for the import template.
-
Active: Tick the box to activate the template.
-
Import type: Select the type the import template will handle. If you select Account code in the next step you can choose which account code dimension should be imported.
-
Field delimiter: Choose the character that separates the fields in your file.
-
Fixed field length: The program reads records in blocks of a specified length. You then need to specify the starting position and length for each field.
-
Tab: Tab character is used as a delimiter.
-
Characters: Select your own character.
-
-
Skip introducing rows: If your file has a header row or similar that should not be imported, fill in the number of rows to skip.
-
Date format: Specify the date format used in the file.
-
Add field: In the field list, select which field names are included in the file.
-
Click on Add row for each field you want to include.
-
Click the magnifying glass to bring up selection and descriptions of fields.
-
Adjust the order by dragging and dropping the blue arrows.
- If you have chosen Fixed field length specify the starting position and length.
-
Example
To import new cost centres we can create an import template containing code, name and active from-date.
We select semicolon as field delimiter and date format yyyy-mm-dd.
We fill in 1 in the field Skip introducing rows.
The file looks like this:
5;Kst 5;2025-04-01
7;Kst 7;2025-05-01
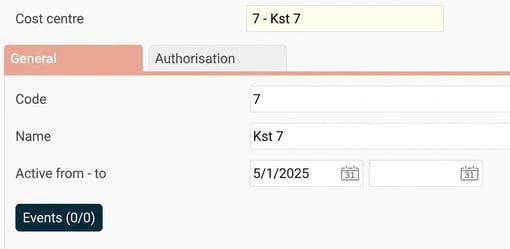
Only cost centre 7 is imported, because the first row is skipped.
Import data from file
Go to Actions processed > Service routines > Import.
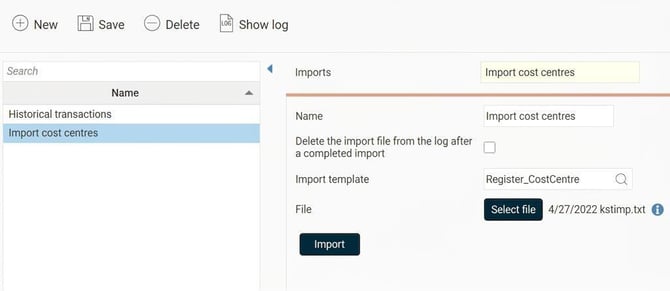
-
Name: You can specify a name if you want to save the import so you can schedule it or run it several times.
-
Remove import file from log after completed import: Tick the box if you want the file to be removed from the log when the import is finished.
-
Import template: Select the import template you have created.
-
File: Click on Select file to upload your import file.
-
Click on Import to start the import immediately. You will receive a notification when it is finished.
-
Show log: D etails about the import, such as when it started and finished and any errors. If something has gone wrong, you will find an error log informing you which rows could not be imported and why.

Schedule import
You can schedule a saved import so it runs automatically at a certain point in time.
-
Go to Settings > Import/Export > Scheduled task runs.
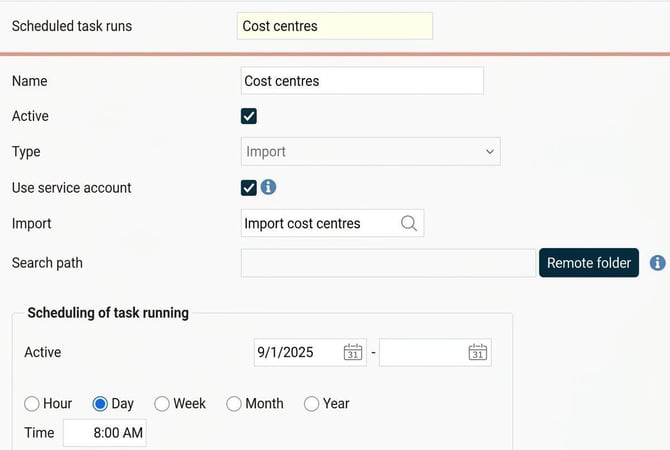
-
Specify a name for the scheduled task running.
-
Select which import you want to schedule.
-
Set how often and at what time the import should run.
-
Set a remote folder where the import file should be collected.
-
Save.
At the point in time you have set, for example every day at 08:00, the import will run.
Good to know about service account
So that the scheduled task running is not dependent on a specific user, tick the setting Use service account. If you do not do this, the user who saved the task running will be listed as the import user, which can cause problems if that user is deactivated or has changed authorisations.
In the view for Scheduled task runs, you can always see which user created and most recently changed a scheduled task running.
Please note: This article is AI-translated. This means that linguistic errors or misunderstandings may occur.