
💻Here you will find a description of the workflow for digital signing of documents in HRM.
Contents
Activate licence
Program link - Activate integration
Select document for e-signing
Authorisation
Integration to Verified
With this module, you can send Contracts of employment, HR-forms and CVs for digital signing in Verified via HRM, avoiding paper handling and manual signatures. Managers, HR and others get a complete overview in HRM of all ongoing and signed documents, so there’s no need to work in several systems for document handling.
Verified manages the email dispatch to all signers, reminders for documents not yet signed, and the handling of the technical signing process. All documents are available in both HRM and Verified.
To use the integration with Verified, there must be an agreement between your company and Verified. Contact Verified for more information on terms and price for activating the integration.
Activation – Step by Step
Licence
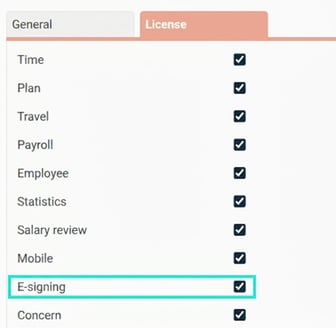
To activate the e-signing function, you must first activate the E-signing licence in HRM. Under Administration – General – Company you can see if your company has the licence:
Program link
To activate the e-signing function, you must first create a program link to Verified.
Go to Administration – Settings – Import/export – Program links.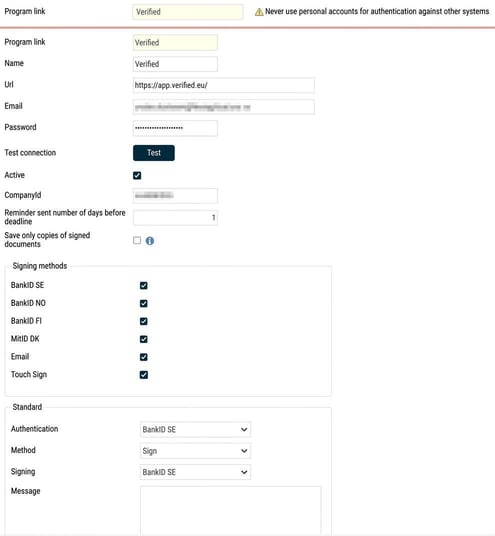
- Select program link Verified
- Specify a name, e.g. Verified
- Here you specify the user in Verified that Flex HRM will use to communicate with Verified. We recommend that you specify an administrator account here with access to all HR-related documents in Verified. All documents sent for signing from Flex HRM will be linked to this account in Verified. To show the status of documents in Flex HRM, this user must have access to the status of all documents.
- Click on the Test button to check that you get a connection to Verified. You will see at the bottom right corner whether you succeeded or not.
- You need to specify a CompanyId to make sure the documents reach the correct company in Verified. Once logged into Verified, you will find this ID in the URL after the equals sign. If you have several companies added in Verified, you will find them there under the Group menu. Add the respective CompanyId to the corresponding Company program link in HRM.

- Specify how many days before the deadline Verified should send a reminder to the recipient.
- Save only copies of signed documents – see separate heading below.
- Select which signing methods you use.
- Specify which default values should be displayed every time you send documents for signing. These can be changed for each signing, i.e. the default values are just a proposal.
Save only copies of signed documents
All e-signed documents in Flex HRM are actually links to documents stored with Verified. The function to save copies of the documents can be useful if you only want documents stored in Flex HRM and not with Verified. It can also be used when changing e-signing provider, allowing you to save your signed documents with the current provider before the switch. If you do not save them before the change, the documents (actually the links to the documents) will disappear from Flex HRM when the program link is deactivated. As long as you have the opportunity to reactivate the program link, you can retrieve the links to documents and then save copies of them as described below.
Note that it is only fully signed documents that a copy is saved of, i.e. not documents with status Aborted, Rejected or Overdue.
Once you activate the tick box and save, you cannot undo. This means that signed documents which have become copies can no longer be linked back to Verified. The documents that are not signed (Ongoing, Aborted, Rejected, or Overdue) will remain linked to Verified.
Be careful when using this tick box. Contact a consultant or consultant booking at Flex Applications if you have questions.
Select document for e-signing
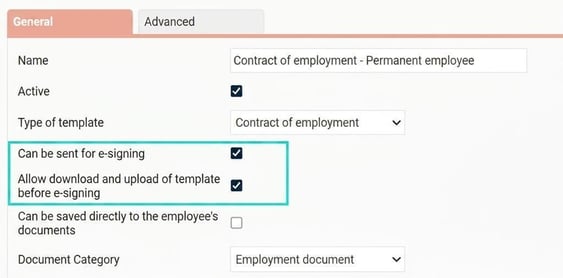
To send a contract of employment or HR-form for digital signing as described earlier, you must first activate this in the settings for the document.
- Go to Administration – Settings – Personnel – HR-forms. (This controls which documents can be sent for e-signing, as there is an ongoing cost per signing.)
- Tick Can be sent for e-signing for those documents concerned.
- Tick Allow download and upload of template before e-signing in cases where you want to edit a document before sending it.
Authorisation
Set the authorisation below for e-signing for the roles that should be able to see the overview for e-signing.
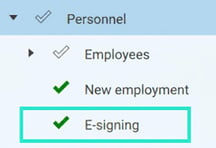
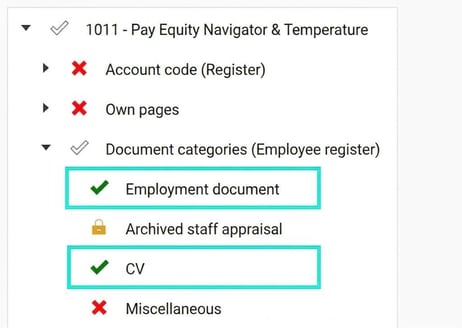
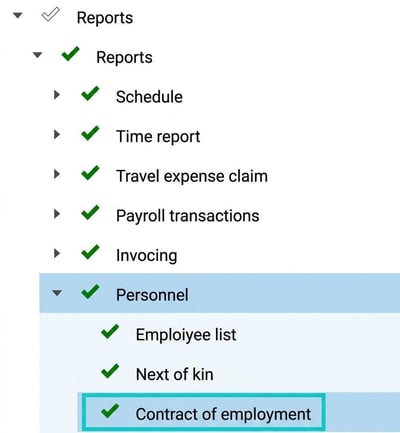
Remember that you must have authorisation for HR-forms/CV, document categories for relevant HR-forms and authorisation for The report Contract of employment (applies only to HR-forms of the Contract of employment type) in order to retrieve HR-forms for e-signing.
Authorisation controlling whether the role can retrieve HR-forms and CVs

Controls which HR-forms can be retrieved (Document Category)
Below, HR-forms linked to the categories "Employment documents" and "CV" can be retrieved. If there are HR-forms linked to the "Miscellaneous" category, this role cannot retrieve those forms.
The report controls whether HR-forms of the "Contract of employment" type can be retrieved
For contracts of employment, the above is required + this authorisation
Please note: This article is AI-translated. This means that linguistic errors or misunderstandings may occur.