
Transfer of travel expense claims to payroll
Under Actions processed there is the menu Transfer of travel expense claims to payroll.
Please note
If you use HRM Payroll, you retrieve travel expense claims from payroll processing. This article only applies to those who use a payroll system other than HRM Payroll.
A file is created in the file format selected in the payroll connection and is then imported into the payroll system.
New transfer
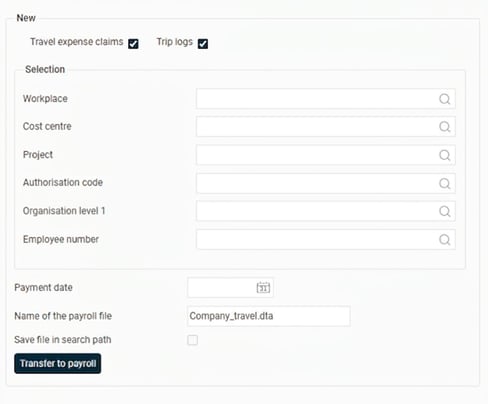
In this view, you enter the information required to create a new transfer.
You can choose whether to transfer travel expense claims, trip logs, or both by ticking the relevant check box or check boxes.- Cost centre/other account codes: Here you can choose based on the employees’ home account codes.
- Employee number: Here you can filter by specific employee numbers. If you do not make a selection, all employees with audited travel expense claims are included.
- Payment date: Select a payment date for the travel expense claims you wish to transfer to payroll. This date should be the same as the payment date in your payroll programme. The payment date appears on reports printed for the period.
- Name of the payroll file: Here you can view or enter the name of the payroll file.
If a file name has been specified under Settings > Payroll connection, the tab Travel, the name is fetched automatically from there.
When you are finished, click the button Transfer to payroll to start the transfer.
The travel expense claim is then marked as transferred to payroll.
Completed transfers

Here you can view information about transfers that have already been completed.
- Status: Shows the status of the transfer.
- Signature: Here the signature is displayed for the user who carried out the transfer.
- Info: Click the information icon to view expanded information about the transfer. For example, details on the number of travel expense claims and transactions.
- Reverse: This function allows you to reverse a period.
Click on the green arrow. The travel expense claims that were calculated are then restored, and you can make changes to them again. -
Re-transfer to payroll: Used to create a new file for the same run, without having to roll back the original transfer. Note that the new file will overwrite the original one.
This feature is useful if you have changed your settings and want to regenerate the file based on the new conditions. For example: When you first created the file, you hadn't set cost centers to be included under Settings > Payroll > Payroll connection. Now that you have enabled this, you want to recreate the same file with cost centers included.
Please note that this feature does not recalculate travel expense reports. If you, for instance, have changed an employee's default cost center, the processed travel expense reports will still retain the previous one. In such cases, you cannot use "Re-transfer to payroll"; instead, you must roll back the transfer, recalculate the expense reports, and then make a new transfer to payroll. - File: The current transaction file is located here. Click on the icon to download the file. Double-click or right-click on the file and select Open from the menu. Then save the file in your desired directory on your computer.
Please note: This article is AI-translated. This means that linguistic errors or misunderstandings may occur.