
Content
Create additional fields
Create own tables
Layout
Create new own tab
Move page content to another tab
Reminders
Authorisation for own pages
Create your own field under an existing tab
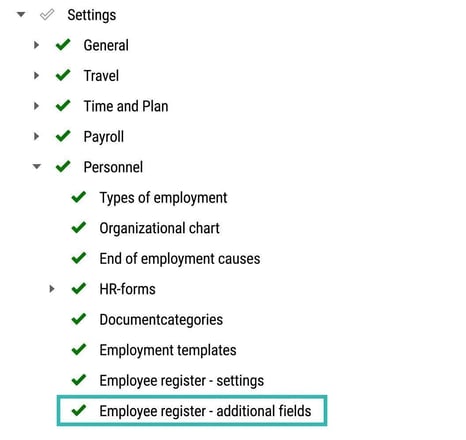
To create your own field, select Settings – Personnel – Employee register – additional fields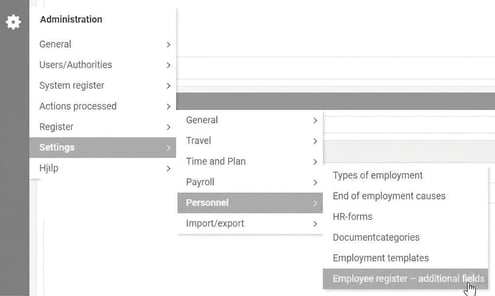
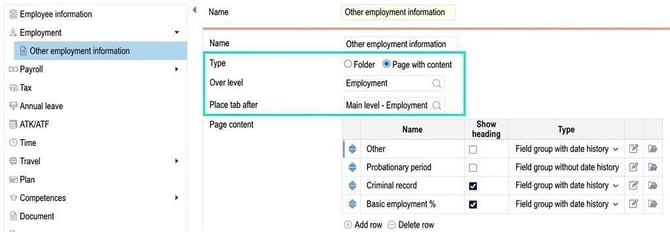
- Choose where to place your own field (on which own page). In the example below, additional fields have been added under a custom page called Other employment information.
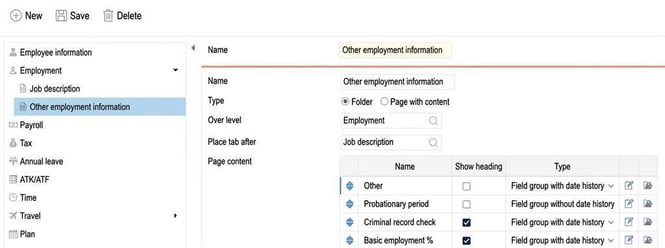
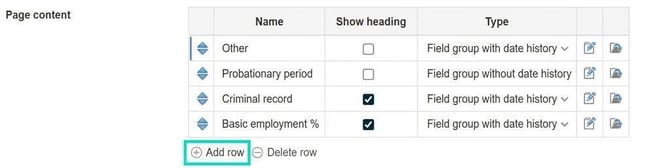
- Click on Add row to create page content.
- Choose which type of field you wish to create.
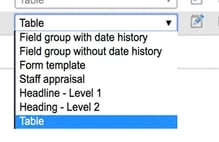
Type
Indicates the type of page content. The following options are available:
|
Field group with date history |
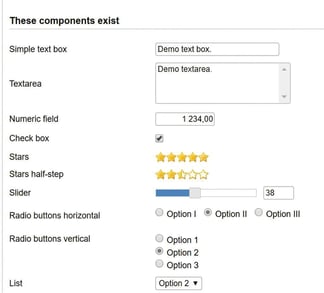
Fields with date history are selected to enable date tracking for a value and to maintain a history of its changes. This is useful for things like salary supplements and various benefits. In the employee registry, the field is displayed in a table showing the current value for each field. In addition to numerical fields, field groups allow you to create text fields, checkboxes, and various rating scales, such as stars and sliders. |
||
|
Field group without date history |
This option should be selected if date tracking is not required and you simply want a basic input field directly on the tab. |
||
|
Form template |
Used for page content on the Performance Review tab (or another tab in the employee registry selected for managing reviews) or for other types of employee surveys and questionnaires. |
||
|
Performance review |
Used for page content on the Performance Review tab. The Performance Review and Form Template types are very similar. The difference is that for the Performance Review type, you specify the manager responsible and the date when completing a template in the employee registry. |
||
|
Heading – Level 1, Heading – Level 2 |
To create different sections on a tab, you can add headings at different levels by inserting a page content row and selecting Heading – Level 1 or Heading – Level 2. Level 1 headings have a larger font and an underline, while Level 2 headings have a smaller font with no underline. |
||
|
Table |
This function can be used to create clear, organised columns. For example, it is used when building CVs/resumes. |
||
|
Date field |
Used to create a standard, standalone date for custom fields, which can be useful in custom tables as shown in the example above. |
||
- If you want to use headings, you can, for example, set it up as follows:
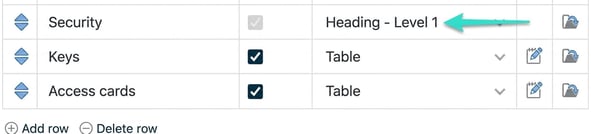
- To edit/add content, select the pencil to change/add values.
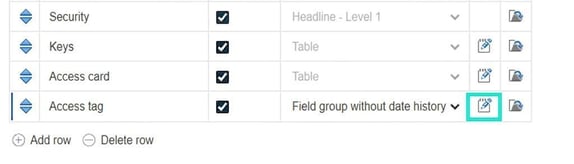
- You can now name your field, select the field type, values, number of characters and/or decimals.
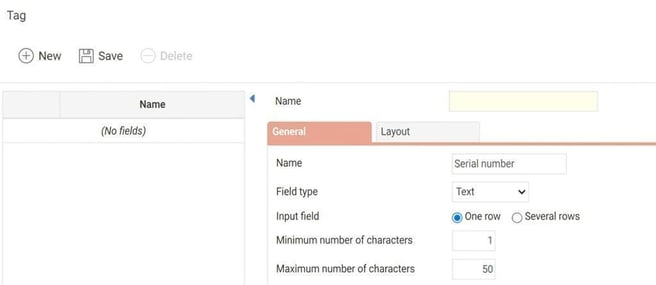
- Select field type. The field type will determine how the field functions and which options are available for the relevant field. Save
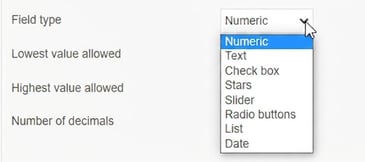
| Field type | Description |
| Numeric | Numbers |
| Text | Letters |
| Checkbox | Checkbox, for example Yes or No |
| Stars | Rating scale, e.g. 1-5 |
| Slider | On or off, i.e. either/or |
| List | Drop-down list with options. |
| Radio buttons | Option buttons, e.g. Good, Bad, Don't know. |
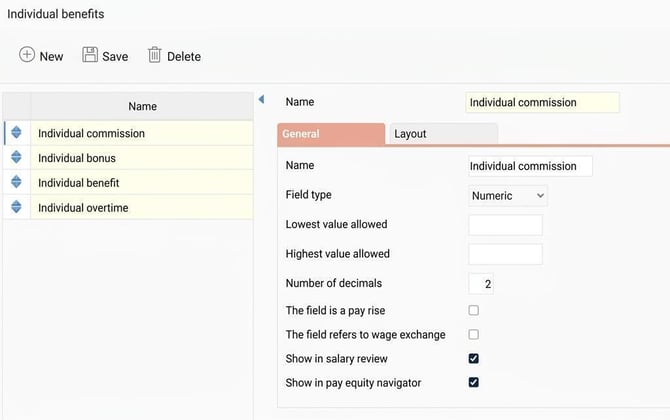
- If you wish to customise the field further, you can make various settings. See General and Layout. In the example below we choose to create a Numeric field for individual bonus. We want the field to be visible both in HRM Salary review and HRM Pay Equity Navigator, so we tick “Show in”. Save
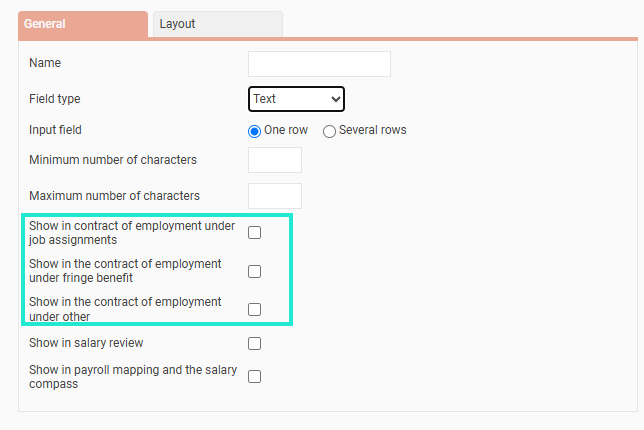
Regarding the choices for "Show on the contract of employment in the box..."
When you choose to create your own fields using the Text field type, there are some settings for contracts of employment. These settings apply only to the standard contract in HRM, i.e. not the templates you create through HR-forms. When the standard contract is used, the tick controls where in the contract of employment the field will appear. The vast majority of customers use their own HR-forms, in which case this setting is redundant.
Own tables in the employee register
Every company has its unique requirements for information to store in the employee register. To provide as much flexibility as possible, we have further developed the function for additional fields to allow the creation of own tables. An example of an area of use is to document previous work experience relevant to the current job.
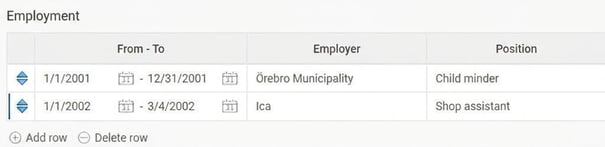
To create a table, create a page content. Select on the list on the left which tab you want to create the table on (you can also move the table to another tab later), and then add a row in the list of page contents with your desired name and set the type as Table. 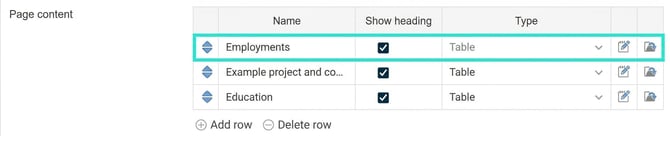
The final step is to choose which columns should be in the table. You do this by clicking on the penn icon to edit, which is to the right of the type column.
In the window that opens, add the different columns in the same way as you create your own fields. You can also choose the sequence of the columns in the list on the left.
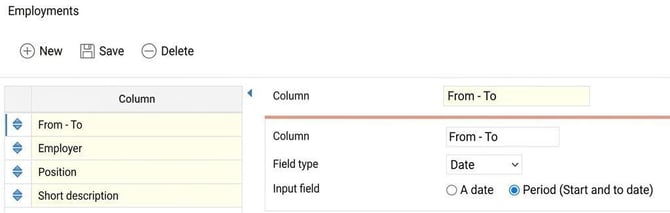
In this simple way, you can create tables on whichever tabs you want to store information structurally. You can also export the contents of a table in an HR-form or via an export if you want to extract information from the table for several employees at the same time.
Here are more examples of how different own fields in HRM Employee
Selectable size and heading for text boxes and numeric fields
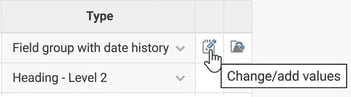
You can choose both the size and the placement of the heading for additional fields of the Text and Numeric types. Select the tab and the page content where the field you want to adjust is placed and click the button Change/add values.
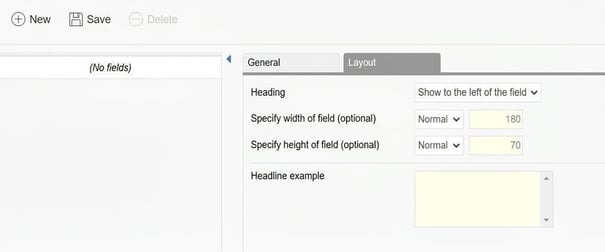
For the desired field, on the Layout tab you can change the size and heading placement. Below the settings, you can see the results of the current settings. Layout change the size and the heading placement. The result of the current settings is shown below the settings.
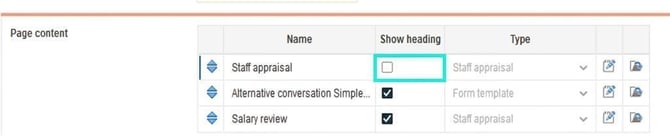
Optionally show headings for page content
You can also choose whether the heading for the page content should be shown or not.
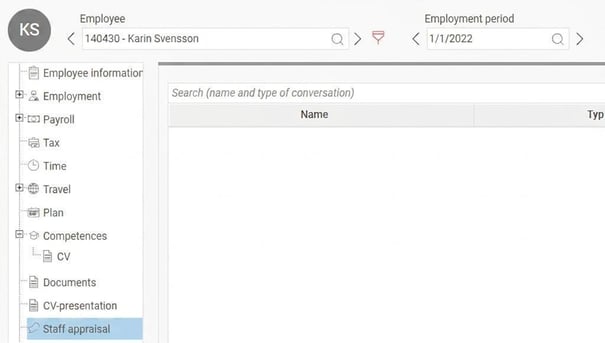
If on the Staff appraisal tab you want one single list with all types of appraisals, it may be a good idea to hide the heading to avoid unnecessary repetition, as the tab has the same heading.
In the employee register, it will then look like this (no heading above the list):
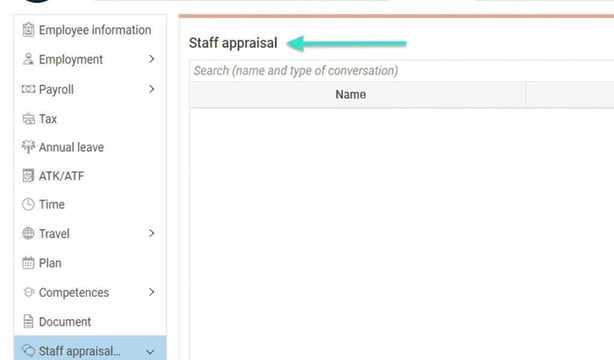
If instead you have chosen to divide different kinds of appraisals into separate lists, it may be practical to show the heading.

In the employee register, it will then look like this:
Add a new tab
Your own tab will act as a new menu in the employee register, where you can create additional fields with your desired content. Using authorisations, you can decide who will have access to a tab and its content.
- Choose Name for the tab.
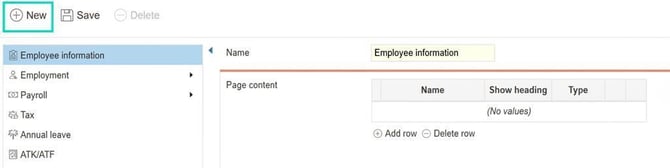
- Select whether it should be a Folder, i.e. with subfolders, or a Page with content.
- Select no over level to create a completely new tab and select where you want to place the tab, e.g. after ‘other information’. It will then look as per the image below. To be able to edit and create a field, there needs to be a page with content under the folder.
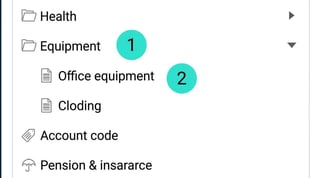 1 = Folder
2 = Page with content
Move page content between tabs
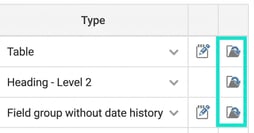
If you want to change the tab structure, you can move page content from one tab to another. You do this by, for the desired row in the list of page content, clicking the move icon on the far right. You will then see a list of pages to which you can move the page content. When you move it to a new tab, it will be placed at the bottom of the receiving tab. If you wish to change the position, open the tab and arrange the page content in your preferred order.
Own fields in selectable order
It is also possible to choose the order in which fields are shown within a field group by dragging and dropping them with the arrows to the left of the field name. 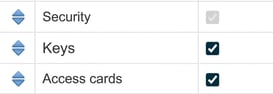
Reminders for own fields
Certain types of additional fields may need monitoring for expiry. To make this easier, you can create a reminder to alert the person responsible.
To enable this type of reminder, go to Administration – Settings – General – Reminders and create a new reminder of the type Own fields. The following settings can then be made for managing reminders:
- Type of surveillance
You can select between two types of surveillance for additional fields:
- Monitor the end date
This can be used for fields with date history to monitor a field’s end date. A common use is monitoring pay rises. - Check the field’s value at a specific point in time
If you want to check a value at a certain time, you can use this type of surveillance.
- Selection of employees
Here you can select which group of employees the reminder should apply to.
- Selection of additional fields
Here you select which field the reminder should refer to.
- Scheduling of reminder
Here you select how often reminders by email and notes in HRM Mobile are to be sent out to the recipient. For example, you may want to send an email to all managers with employees whose competences are expiring every Thursday at 3 pm.
- Message to employee
Here you specify the desired type of reminder and a message text that will be sent to the employee. If you do not choose any reminder type, no reminder will be sent.
- Message to users
Here you specify the desired type of reminder and a message text that will go out to the selected group of users, usually managers or HR departments. You can either select specific users to receive the reminder, or choose roles, such as authorising manager, who should receive a reminder. The reminder will then be sent to the users with the selected role for the employee to whom the reminder relates.
Authorisations for own pages
Administration – Users/Authorities – Roles
To be able to create your own pages and fields, you need to enable it on your role:
To view the additional pages available in the employee register, you need to enable these on the role or roles to have authorisation for them.
It is very important to note that Own pages that are directly under Personnel - Employees on the role give authorisation to all own pages that are created.
We therefore almost always recommend having Own pages off, i.e. red cross, under Employees; otherwise, the consequence is that when you add more pages, everyone with the role will be able to see everything added.
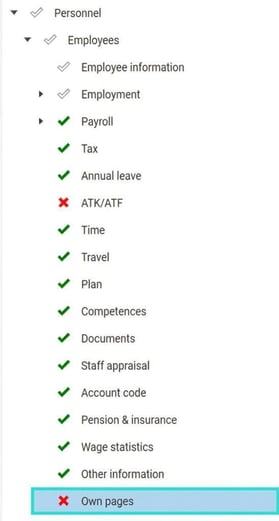
Instead, you should manage the authorisations from the tab Menus - Company-bound per role as shown in the images below. This way you always have control over which roles get authorisation to a page. Remember: if you create new pages, you must actively activate authorisation for the page on relevant roles.
Here we see that the role of manager has full authorisation (Active) to Staff appraisal - Goal. Read only to Health checks, Office equipment and Other employment information. While CV, Sick note, salary review and Clothing are completely blocked (Not available).
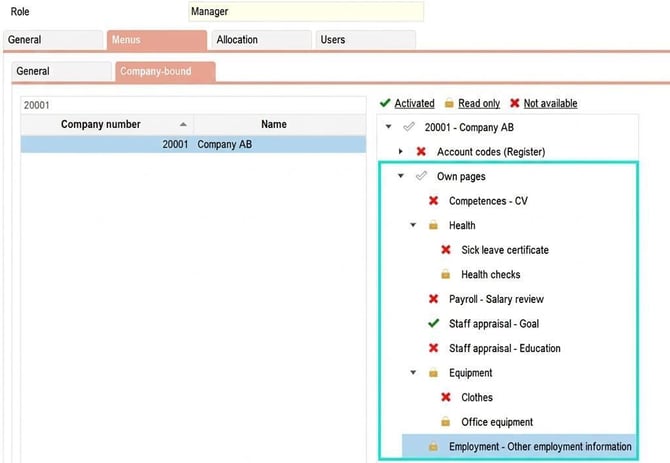
Note that Company-bound settings on a role are per company. Which means you must set it for each respective company if you have several companies.
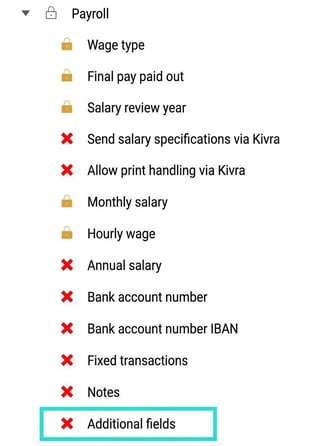
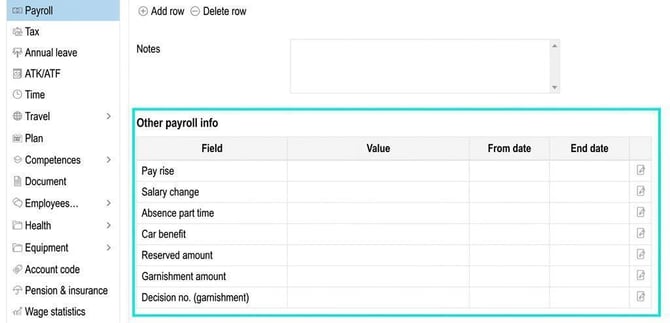
Under the menu Personnel - Employees - Employment and under Personnel - Employees - Payroll there is an authorisation called Additional fields. If you give your role authorisation for Additional fields under this menu, it means that the role can see all additional fields created directly on the Employment or Payroll tabs respectively.
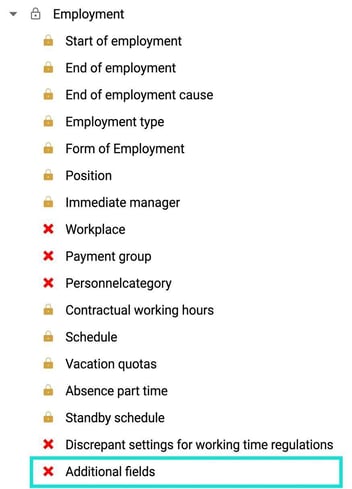
Example of own fields created directly on the Payroll tab in the employee register:
How do you make a sub-page visible for a role?
For a role to see a sub-page, you first need to grant authorisation to the parent page or menu. The role needs authorisation for at least one assignment under the parent page for the sub-page to appear.
Example
If the Manager role is to see the tab Employment - Other employment information, you must grant the role authorisation for at least one assignment under the page Employment, for example position, only then will Other employment information be visible for the Manager.
Please note: This article is AI-translated. This means that linguistic errors or misunderstandings may occur.