
This product is under development. The content of the article will be updated as new changes are made.
Preparatory settings
✅Activate license
✅Activate authorisations
✅Create/activate additional fields for pay rise and allowances
✅Check and prepare data for employees
Below you can read more about what you need to do to get started with the Pay Equity Navigator.
License
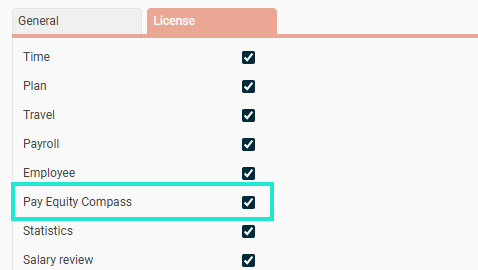
Activate the license for Pay Equity Compass for your company under General > Company. Select the License menu and tick the module.
Can't find the license?
Go to Administration > System register > License, at the bottom click on Update the license.
Authorisations
Before you start working with your new module, you need to set the correct authorisation for those who should have access to the views in Flex HRM.
You do this under Users/Authorities > Roles.
Set authorisation to the Pay Equity Compass module by going to Menus and General.
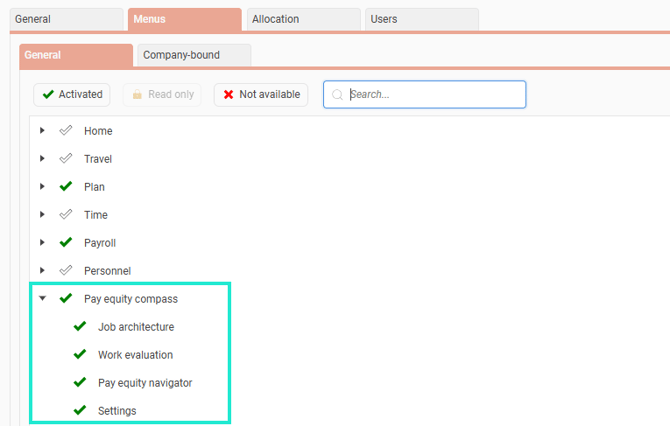
Important that you will see all employees if you have authorisation to the views in the pay equity navigator. The usual authorisation settings, where you only see the employees you are otherwise authorised for, do not apply in the Pay Equity Navigator.
The view Pay Equity Navigator show details for all employees and their salaries. Be particularly careful which roles you grant this authorisation to.
Additional fields in the pay equity navigator
In your pay equity navigator in Flex HRM, you analyse the total salary and allowance. This means you need to specify which fields for pay and benefits, besides the standard full-time wage, should be shown in the navigator.
The fields you want to be visible must first be activated in your settings.
How to choose which fields to show
You manage the settings for your fields by following these steps:
-
Go to Settings > Personnel> Employee register -Additional fields.
-
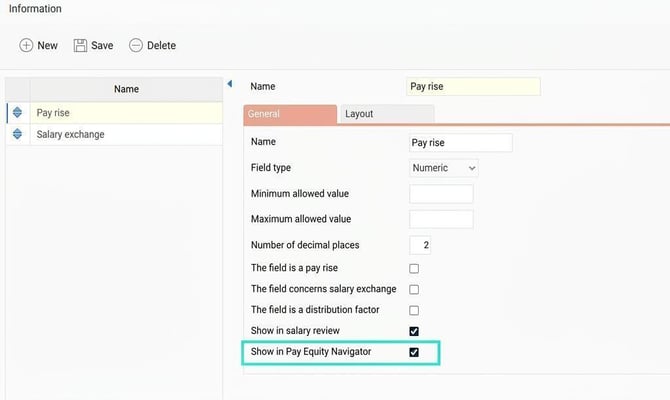
Find the fields that are current for your organisation, for example Pay rise.
-
Tick the box Show in pay equity navigator for the fields you want to include.
Once you have done this, the fields will be available as specification when you work with your pay equity navigator in the Pay Equity Compass.
If you lack specific fields to cover all increments and allowances in your pay equity navigator, you can set up new fields and tabs yourself. Read more here about your additional pages and fields in HRM.
How do you prepare information about employees for pay equity mapping?
To perform an accurate pay equity mapping in the Pay Equity Navigator, all information about your employees must be updated and complete. This is especially important when it is time to start this year’s analysis.
Check and complete employee information
Go through the list below to ensure the information in Flex HRM is correct:
-
Payroll: Check that payroll data exists for all employees.
-
Employment type: Make sure the employment type is set correctly. Note that the system does not include the 'External personnel' employment type in the navigator.
-
Gender: Check that gender is defined for all employees. The system primarily retrieves this information from the personal identity number, or otherwise from the gender field.
-
Start of employment: For the system to be able to show period of employment, you need to specify a date of employment.
-
Date of birth: If you want to see mean age in your statistics, the date of birth must be registered.
-
Position: Check that positions are specified in both the position register and on the individual employees.
- Personnel category: Under Settings > Payroll > Personnel categories you can, per personnel category, set an hourly wage factor for the Pay Equity Navigator. The default value is 173.
An employee is assigned a personnel category in the employee register to follow the personnel category’s hourly wage factor.
Manage pay rise and other variable allowances
To calculate the total allowance for an employee (for example pay, pay rise, benefits, commission and bonus) you may need to make manual calculations of average values of variable allowances.
Follow these steps to enter the correct values in Flex HRM:
-
Create additional fields: Create one or more additional fields in the system for the allowances you want to include, for example for commission or benefits. First check which additional fields you already have, and if needed, create new fields. See the section about additional fields above.
-
Calculate average: Calculate an average per employee for the allowances that are variable. A common example is to calculate the average commission for the previous twelve months.
-
Import values: Once your calculations are complete, import or register the values on the relevant employees in Flex HRM. Remember that the date of the field must be active when you create the pay equity navigator for them to be included.
Example
You create the pay equity navigator with the date 2026-06-01.
For allowances from additional fields to be included, they must be valid at the current date.
You enter the value for commission with end date of 2026-06-30. Thus, the value is valid on 2026-06-01 and will be included in the pay equity navigator.
If instead you had entered the field with end date of 2026-05-31, the value would not be included. This is because the end date is set before the date when the pay equity navigator is created.
Related articles
Get started with Pay Equity Compass in Flex HRM – Checklist
Please note: This article is AI-translated. This means that linguistic errors or misunderstandings may occur.