
Contents
General information about importing data
Create an import template
Import data from file
Important to know
Import data into Flex HRM
By importing data with files in the formats .csv, .txt or .tsv you can efficiently enter large amounts of information into Flex HRM. This article describes how to create an import template and import files for employment periods.
If you have not done imports in Flex HRM before, it is a good idea to read the general description of imports in Flex HRM first.
If you are unsure, we recommend seeking consultant assistance. Handling imports of employment periods can be quite complex. Since it is not possible to reverse an import, it is better to get help or advice from a consultant. Contact us via the Service Portal and we will assist you.
Create an import template
An import template is necessary for Flex HRM to know how to read an import file. The template defines what information should be entered into the system and where. For example, if you are importing employees, you must specify what in the file refers to employee number, first name, surname, and so on.
Sometimes there are already existing import templates you can use as a starting point. Below is a guide with an example of an import template for importing employment periods, where each field corresponds to a column in the file (Field 1 = Column A, etc.):
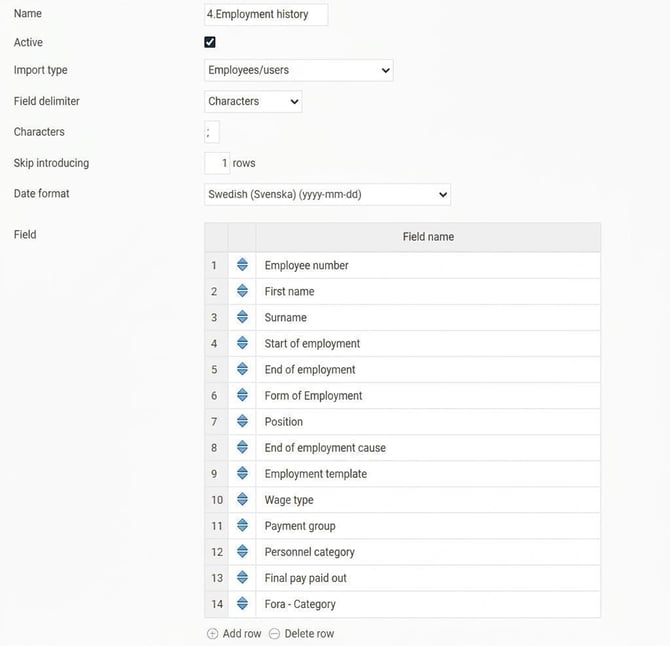
How to create an import template:
-
Name: Specify a name for the import template.
-
Select Import type: Employees/Users
-
Select Field delimiter: Select the character that separates the fields in your file.
-
In the example above, the following character ; is set for import of a CSV (comma-separated) (* .csv) file.
-
-
Skip introducing rows: If your file has a header row or similar that should not be imported, enter the number of rows to skip. In the example above, we skip 1 row.
-
Date format: Specify the date format used in the file.
-
Add field: In the field list, select which field names the file contains.
-
Click on Add row for each field you want to include.
-
Click the magnifying glass to view selection and descriptions of fields.
-
Adjust the order by dragging and dropping the blue arrows.
-
In the example above, only fields linked to the employment period are imported. However, it is possible to add more details such as address, email, and mobile number, etc. You can either import many fields at once or choose to split it into several imports. If you have a lot of data, it may sometimes be best to separate it into different imports.
Note if the employee is not already set up in Flex HRM, there are certain requirements for what must be included in the file. See more information about what you should check under the section Important to know further down.
Import data from file
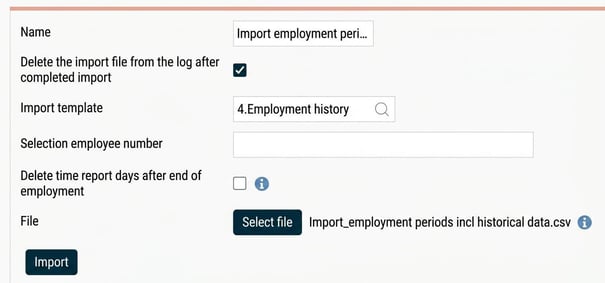
Go to Actions processed > Service routines > Import.
-
Click on New to create a new import.
-
Specify Name: You can specify a name if you wish to save the import to schedule it or run it several times.
-
Remove import file from the log after import is completed: Tick the box if you want the file to be removed from the log once the import is complete.
-
Import template: Select the import template you have created.
- Selection employee number. A tip is to first start by importing one employee to check that the import works as expected. Select one employee number for a person in your file.
-
Click on Select file to upload your import file.
-
Click on Import to start the import immediately. You will receive a message when it is complete.
-
Show log: D etails about the import, when it started and finished, and any errors. If anything has gone wrong, there is an error log informing which rows could not be imported and why. Click the icon to download the error log.

Important to know
- Before importing, check the setting for what details must be specified upon first save, see Settings > Personnel > Employee register – settings. Ensure all required fields are included in the import or temporarily untick the requirements in the setting. If you remove the requirements, note down what they were so you can reset the setting again.
- If the employee is not registered in HRM at all, when importing you need to check what value is chosen in the user template for User-ID. This applies if you import an employment template linked to a user template, where the user-ID is to be created automatically. It is common for email to be the user-ID in HRM, and in that case, information about this must be included in the import file for the user to be created.
- If you have activated New employment in Flex HRM (HRM Employee), all new employments will be placed into the audit flow. If you do not want this, we recommend you first deactivate checking levels in the flow/flows.
- An import cannot be reversed. Therefore, we recommend first testing your import on one or two employees to ensure the import template and file match exactly. Filter by employee number.
- When importing employment periods, it is very important to include Start of employment and End of employment.
Usually, current personnel with the current employment period are initially imported into HRM. It is especially important then to ensure that the start of employment entered is the start date of the latest employment period (not the first date of employment in the company). Some payroll systems only contain the very first start date, but in HRM this causes problems if you want to import a history of employment periods later.
- Note that the correct start date for the employment period must always be provided in the file so HRM can identify the right employment period. Importing only the end of employment without a start date is not recommended and should be avoided.
- Sometimes it can be difficult to know which employment template is appropriate for all historical employment periods. In that case, it is possible to import employees without an employment template. However, we always recommend importing with an employment template if you are importing a history for external personnel, to include Employment type from the employment template.
Note!
If employment history is imported without an employment template, note that The option Copy details from existing employment period will not find an employment template. That is, if another employment period is then created in HRM for the employee and you choose to copy details from an existing period (and it is one imported without a template), then Flex HRM will not find a template. If you have an active standard workflow, the employee will end up in that flow. Pay particular attention to this if you choose to deactivate the standard flow completely (for example, you want to steer certain employees away from the audit flow), as it is quite common for employees to be re-employed/to have new employment periods. We therefore recommend including an employment template even for the history if you want to avoid problems in the future.
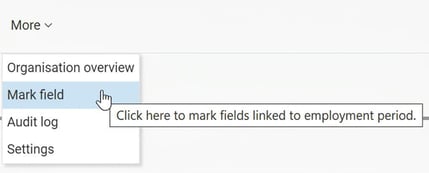
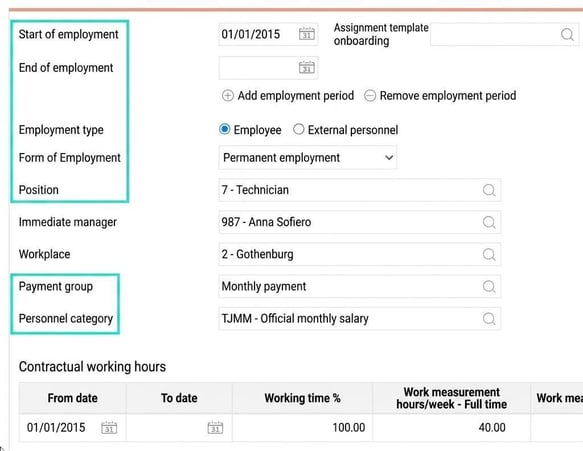
- There are many fields in HRM not directly linked to the employment period; instead, they have their own start and end date fields. Common such fields where importing historical data may be relevant are monthly salary, hourly wage, contractual working hours, and additional fields such as pay rise. As these fields are not directly linked to the employment period in Flex HRM, it may sometimes be easier to import this history separately. To see which fields are linked to an employment period, click on More - Mark field when you are viewing an employee in the employee register. Blue fields are linked to the employment period.
Checklists
Checklist for importing current employment period
✅ Check the settings above
✅ Ensure that the latest start of employment (employment period) is in the file.
✅ If there are forthcoming employment periods after the current one, the end of employment must be included in the file.
Checklist for import incl. historical employment periods
✅ Check the settings above
✅ Ensure that start and end of employment are included for all employment periods
✅ Ensure that there are no overlapping employment periods
✅ Ensure that all employment periods have Form of Employment and Personnel category
✅ Include End of employment cause if you want to be able to follow up in statistics.
✅ If you have HRM Payroll, it is important to import the final salary tick for employment periods where final salary has been paid. This may concern fully terminated employees and active employees, but where one or more previous employment periods have already been given final salary.
Related articles
⚙️LAS - Handling historical employment days when changing HR/payroll system
Please note: This article is AI-translated. This means that linguistic errors or misunderstandings may occur.